Search

Category

contemporary

Hanging the Show (Surfacing, an Artist’s Journey)

Above Works are from Surfacing, an Artist’s Journey

I’ve been working on this solo show for a long time, and am happy to say that it’s now hanging at the Gallery at Glendeven Inn & Lodge, Mendocino now through May 15, 2019.

Happy, and relieved.  Creating a meaningful show that hangs together well is sort of like giving birth.  Less painful, but anxiety-provoking. I was ready to be done with anxiousness. And then another atmospheric river hit the West Coast.

By the time we packed up for the trip, they were evacuating Guerneville and Monte Rio, beloved little towns on the Russian River, and strange weather was creating havoc all over Northern California.  Crazy amounts of rain.  Both Highways to the Coast off of northern 101 were closed due to flooding.  I am told that this is not unusual for Highway 128 when the Navarro is full and the tide is high, but they were turning people away even at Highway 20, a more northerly route we rarely take but that has always been an alternate.  One of my Mendocino friends said that the day we were traveling up, the winding road through Comptche that is always the back route for locals had been plagued with mudslides and trees falling from the sodden hills.  She said, and I quote, “you’d be crazy to drive up here today”.

Geez.  That was enough for me.  I love Mendocino, but I must say I am not fond of these highways where the winding rarely ends, even in good weather.  After almost 7 months of living there and coming back to Livermore at least once a month, I can drive them without whiteknuckling it all the way, but give me a threat of a tree landing on us with the Explorer loaded with 21 paintings representing over four years of dedicated experimentation, study and intense work and the personal safety of my partner and me and, well…

My partner, Duane, is so understanding and a great travel companion.  The radio didn’t help, and neither did the Maps app on my iPhone.  Weturned around and then turned back north first on the rain drenched Freeway 80 Berkeley and started to head home again after Santa Rosa. Then, I checked the weather again for the next day and it looked like it might really clear up – and he looked at me and said, hey, we are so close, let’s head up to Cloverdale and get a motel room and try again tomorrow.

We did, and the rain and even the fog suspended over 128 began to clear by 8:30 am the next morning. The drive was beautiful, as it always is – oak woodlands, lovely Anderson Valley, the ethereal redwoods, and finally the sea – but disconcerting, still.  Small mudslides, too many to count.  Lots of standing water, some flowing over the roads still, streams pushed to their limits, mostly small downed trees chainsawed in half and tossed to the side of the road (Nancy Puder, a good friend that has lived in the area since the 70’s, tells me that locals drive these roads with chainsaws in the back during periods of heavy rains).

Yes, we need the rain.  Yes, I’m thankful this won’t be a drought year.  It would be nice, though, if it would come down a bit more sporadically.

We got to lovely Glendeven early, in time to have coffee and biscotti in the Farmhouse and watch the sea rolling in to Van Damme Beach and the llamas kicking about and the chickens doing their chickeny things while gearing up to lay Glendeven’s free-range eggs.  It was sunny and almost warm.  When it was time to hang, Nancy Puder joined us and we put the show up in record time.  Having capable Duane on my team is mandatory; having Nancy and her designer eye join in created one of those magical art hanging days where it all just seemed to work.  Some people are just easy to hang with in more ways than one.

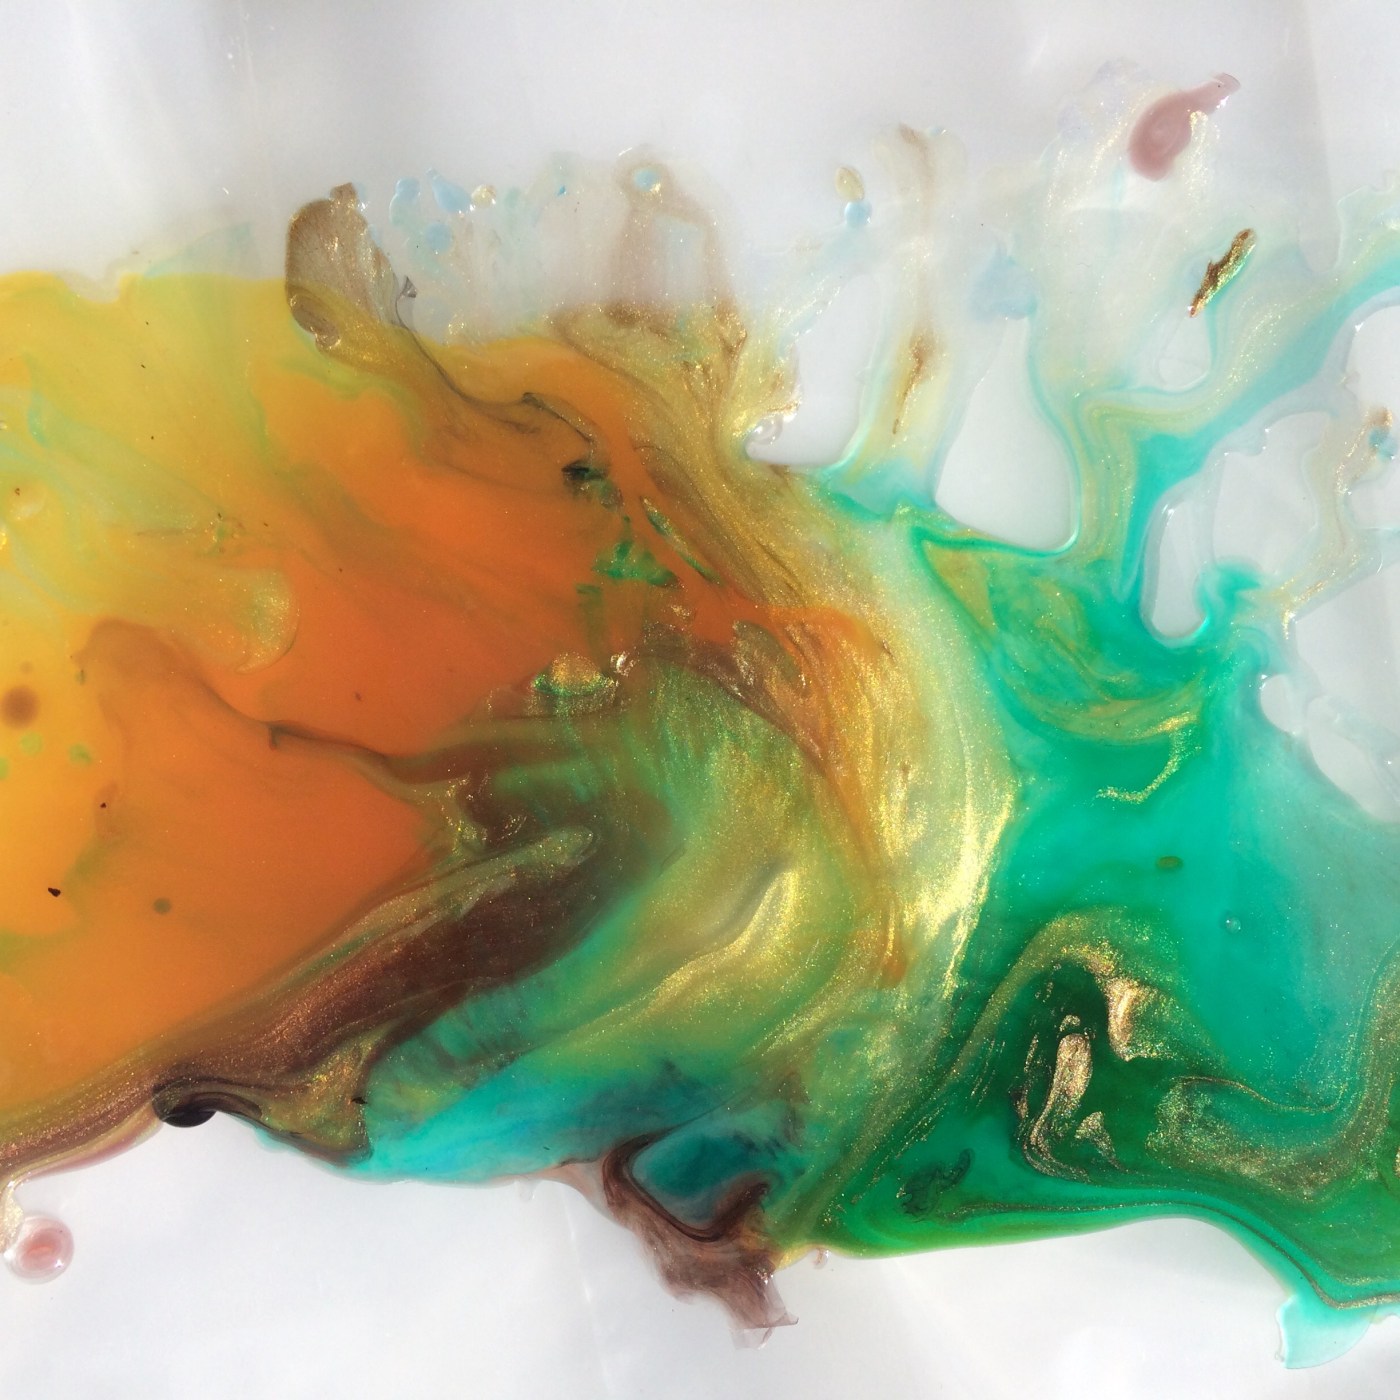
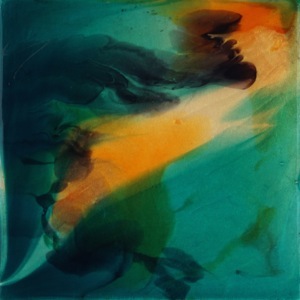
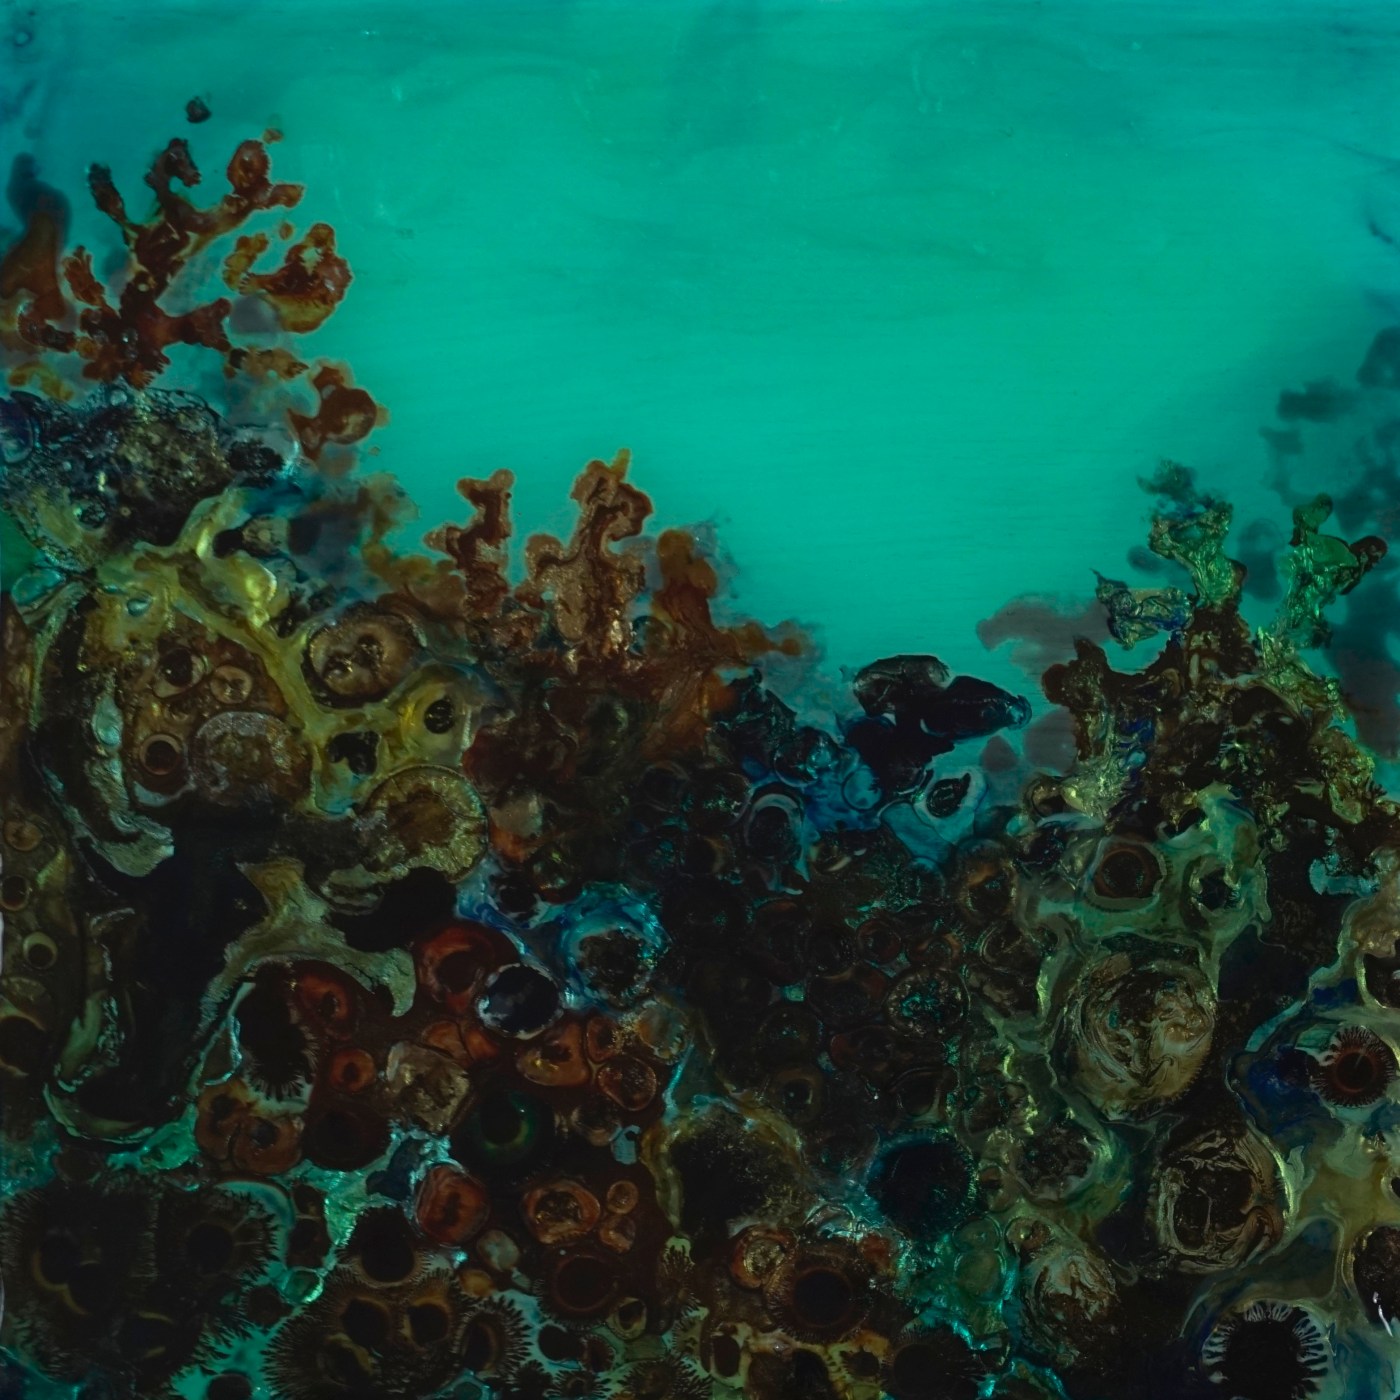
Oh yeah, about the show! Surfacing, An Artist’s Journey, explores the progression of the pour paintings up from underwater – the reef and coral pieces I painted previously – and exhibits the still-evolving coastal rock formations and the sea battering them which were my struggle and goal during my term as Artist in Residence 2017-18 at the Mendocino Art Center.  There’s more to it than that; I’m working on a blog about how they evolved and what happened to me during that program (now that I finally understand it), but this is getting really long and I felt that the journey to actually just hang the show was part of gestating these works and the bringing them up for viewing was part of the journey’s story.

So.  The coastal rocks are joined by several Underwater works in this exhibit. Standing in the middle of the gallery, it’s as if you feel the undulation of the movement of water, like you are in the Pacific but oddly not cold. Peaceful. At one with yourself and your evolutionary journey.  Where you came from, where you are now, and where you are going become one.

That may be taking it too far. Sort of.

The paintings look great hung together.  Yes, I said that.  Those who know me personally know that while I’m not really a braggart (or at least I think I’m not, how does one know for sure?), I am far from humble – at least about painting.  It’s a good show, if I do say so myself.  Pour painting taken to a different level, all painted with a reverence for our ocean and copious amounts of that art explorer thing I think I might be addicted to that I find so fascinating with this medium.

Plus it’s just so cool to see them dry, go from milky to glasslike ahh-ness.  I wish you could see that.

Or see the show.  They are so much better in person.

Glendeven Gallery
This is a previous gallery showing.  The gallery is open 9-12 and 3-7pm daily.

About Glendeven Inn & Lodge

This place is beyond charming, a serene getaway in an amazing setting.  They earn the accolades they’ve gotten from so many magazines with attention to detail and caring for their guests, so much so that they have been expanding and purchasing neighboring property to make the experience available to even more.

Even their website is fun to explore. They give each guest a packet of chickenfeed so that they can become acquainted with the hens that will lay their breakfast eggs!  And, you can participate in llama feeding!!!

You won’t find much on the site about the gallery as they are starting a reboot of it, but they are part of the Mendocino Whale Festival – their weekend is March 8-10, and they’ve done a nice writeup of my exhibition here.

Woot woot!

Pour Painting as Art

I love this process, the freedom and happy accidents that occur with it. If you pour, you know what I mean.

Sometimes the results are wonderful. Sometimes parts of it are.

I saw an ad a popular arts & crafts store did for pour painting, and I thought, you know, I need to put something out there about focusing on pouring to make art, not just arts & crafts. Because it’s fun, like crafting a marble effect, and freeing, it’s become crazily popular. But man, if you saw that commercial, you might see it as fun but their examples left the art out of it.

How to make pour painting art? Simplified, I’d say keep art principles in mind –

COMPOSITION: Composition, perhaps using motion and assymetrical balance as your guide, and unity. You may have a great innate sensibility already tuned to this – don’t discount that. But the classic lessons on composition can really help you create more artful and satisfying pieces and less pieces that end up stuck in the back of the closet.

Here’s a good place to begin for internet studiers

For a more thorough read, you can’t get any better than David Lauer’s Design Basics books. I’ve burned through and given away just about every edition, including the old black and white version. It’s college level, but easy to read and for artists, the short explanations with copious amounts of illustration and photographs are easy to embrace. Visual learners, this book is key.


LAYERING (and gelskin hack):

As you progress, you may find that some pieces have promise but just aren’t satisfactory as they are. Yes, you can layer this stuff. I can tell you from experience that you can layer, and layer, and layer … and soon it will start taking a really long time to dry in between layers. And note – with transparent paints, it’s much easier to go darker in layers than lighter, unless you start adding some opaques, which can be tricky.

You’ll also find that you can also ruin a painting pretty easily by not really knowing what you want to do in that next layer.

Hack: Try the type of layer you want on a piece of plastic sheeting, polyethelene, or even a large Ziploc bag. Let it dry, and check it on top of the piece. If you get an effect you like, you can either recreate it on your piece, or simply peel the gelskin off, and brush on some gloss medium or pouring medium, and apply it to your art making sure to squish out any bubbles. MAKE SURE NOT TO LAY YOUR GELSKIN DIRECTLY ON YOUR WORK, especially if it’s sticky at all.  They may become one.  And, Yes, your surface will be bumpy – try doing a pour over the whole thing (I usually wait until it’s all done, do a final pour and Art Resin to clear up surface issues.

This is only one example of layering – experiment!


COLOR THEORY (and hack): The David Lauer book is good for a bit of this, and there are tons of books out there.  Color Matters offers a fairly concise description – but what you are interested in here is how they are going to react on the painting. And, especially, what you might want to layer on. Sometimes a very light transparent glaze is all you need to tie things together in a beautiful way.

Hack: Use sheets of mylar or scraps of plexiglass from your framer, and mix a little of your transparent paint with pouring medium. Pour a large enough puddle of each in sections on your mylar and let it dry thoroughly. Us this to hold over your painting and see what you might want to add in a layer.  They keep for long use if you put a sheet of polyethylene (painter’s tarps) around them when you store them.  Note – The paint will stick to the mylar – this is not a way to make gelskins.


USE THE SPECIAL PROPERTIES OF THE MEDIUM: I’d go a bit farther, too. The nature of Liquitex Pouring Medium is that it has wonderful clarity and creates spectacular light-bounce. This creates especially lovely effects with transparents, metallic and interference paints (called color-shift by some companies). If you want to use opaque paint, you might save money and try one of those cheaper alternatives like Floetrol* or Glue, like many demonstrate with this on YouTube.  I don’t use them so don’t ask me for advice on that!


Listen, however you want to paint, do it. If you hit those paintings that are pretty but just don’t make you happy, seriously consider doing a bit of study.  You might find it fascinating and fulfilling to use it in your work.


the-rising-6x


The First Month as an AIR MAC (Artist-in-Residence, Mendocino Arts Center)

I almost wasn’t going to post this – it seems so personal.  But posting anything else about this experience will feel false, if I don’t admit the truth, and I want to post about the rest of it as I go along. Being an AIR is a worthwhile experience – but the start can be rocky.

First, I should tell you that like many artists, I’ve dreamt of doing an Artist-in-Residence program for, well, since I first started really painting.  To have time to throw yourself into your work, to have your total goal to be to develop as an artist, to isolate yourself for months on end and find out what you really can do, to stretch to your limits … wow.  What artist wouldn’t want to do exactly that?

Once I was selected to participate and began telling everyone I knew (if you didn’t get the telegraph perhaps you saw the message on the blimp?), most friends and artists cheered me on, but some gave some strange feedback, like, “You are so brave!” and “I could never do that!”  At the time, I brushed those comments off, thinking that they wouldn’t apply to me.

My partner caravanned up here with me on October 1st, helped me set up my studio and studio apartment in the Mendocino Arts Center, in the lovely village of Mendocino, where we are in walking distance of bluffs and crashing waves on three sides (okay, the third is a bit more like a hike).  The night of October 3rd, I was alone for the first time in my new place, but Duane would return in just a few days with a load of finished paintings, in time for the AIR (Artists-in-Residence) Presentations, where this year’s AIR’s would present speeches and a slide presentation about what our work was and what we intended to do during our stay here.

The first week was all setup and focus on the speech, and a little sightseeing, all soaked in a thick layer of poignancy around parting with Duane.  When Duane left on Sunday the 8th, all of the sudden I was really alone.  And that’s the night when the California Wildfires ignited.

I always enjoyed time alone before.  I thought I loved being with my own thoughts.

But – I’ve never lived alone before. I always had either a child depending on me or a partner to share life with, or both.  Being alone occasionally is very, very different from really being alone.

And, being in a place where no one has any idea of who you really are, what you are capable of and what you’ve done is both familiar and new, like re-breaking a bone but not as painful.  It’s like moving to a new school, except you can hole up in your studio and avoid people completely, here, instead of having to interact during classes, lunches, all that.

Getting to know others, and others getting to know you, well, it takes time. It’s really impossible to bring up your accomplishments without being a braggart – and after all these years of being who you’ve grown into, and having a sense of confidence around all that – wow, having arranged your life so that you lose all that is, in the beginning, a bit terrifying.

Add the wildfires to the mix, and to say that first few weeks were a bit anxiety-ridden is an understatement.  Even though the fires were many miles away, there were tens of thousands of acres ablaze in this County, my new home for six and a half months. It was my new neighbors that were losing everything. I wasn’t touched except emotionally, but I had repeat evacuation dreams, night panics that felt so real but truly were nothing like what those poor people had gone through, were going through, are still trying to get through.

Plus I missed Duane. And the cats. And my son. And knowing my friends were so close.  Oh, and my crockpot and our really nice knives with edges sharpened by my partner, especially the one my best bud Marj gave us for Christmas. And the bathtub and a bunch of easy conveniences. My own studio, where I knew where everything was and how it worked (even if it was so much smaller than my space here). I missed my life. Boy, I normally had it so good.

I took a trip home and took a bajillion baths, saw my son and my cats and Duane.

Let me expound on the absence of Duane, my partner. I missed him with the keen intensity of realizing that we are both approaching old age rapidly, that anything could happen to either of us any day and the chances of that increased exponentially with each midnight … WHAT HAVE I DONE?  We could lose each other any day!  Yes, this was one of the night panics, as I’m sure you can tell.

And, I felt strange here, like I didn’t fit.  I’m so not used to this. Even tromping around the Headlands, I just didn’t fit. The beautiful pounding surf just didn’t feel real. Like a pretty backdrop without the power I normally feel around crashing waves.

It’s not just that, either. A confident Linda Ryan can be a little hard to take, I know, but it’s who I am, or at least I thought it was. Once I started painting, I’ve generally known my worth.  And that I’m a pretty decent artist. Usually. An insecure Linda Ryan? Once in a while, sure. But – every waking moment? It really made me question where that confidence comes from. From things? Paintings? From people knowing what you’ve done and can do? It should be a thing that is anchored inside you… What does it all mean, if just being isolated can change that?

I wasn’t sure how to get past it, either.  But, sometime in my fourth week, things started to click.  I began to make friends with some locals. The art started to work.  I cooked myself a real meal instead of a can of soup or a sandwich or something grabbed downtown. I tromped the headlands and it started to become real. I wish I could explain that better. And, when I headed home to help with a Halloween event, it wasn’t with my mental tail between my legs.

It’s easier to look at a wave of low self-confidence when the tide has shifted again. I think it’s probably necessary if you are going to do some serious work, to strip down to skin. Maybe even shed some skin. Get some light on who you are, underneath.  Mixed metaphors and all.

When I got back here after the Halloween Haunt, and passed the first Highway 1 amazing coastal view of those waves pounding the bluffs, the power of it took my breath away. Yes. Next day poured a big 30×30 painting that is gonna really rock when I get it done.  And I’m excited about the work and happy to be here.

Mostly. I’m still a little off.  And I still really miss Duane and the cats and my son and the bathtub. I’ll get along without the crockpot, and I did bring one of the knives with me, to make cooking for myself a more pleasant experience. It’s the Christmas knife, the one Marj gave us.

Glad to have some confidence back, too. But I think the lesson here isn’t fully realized yet. I have work to do – painting, sure. The rest of it may be more important.

Linda

Painter of Strong Women Wants to Meet her Muse – Madonna

D.O.M.'s Great Grandmother
D.O.M.’s great-great grandmother, Russian aristocrat turned snake charmer

What would you expect of the great-great granddaughter of a Circus Strongman and a Russian aristocrat who fled to marry her love and perform as the Circus Snake-Charmer?

That she would be strong? bold? That she would grow up to cherish powerful, rebellious women?

Absolutely. Meet D.O.M., (Dominika Zurawska), a strong, capable woman who has found a way to share of all of this through her powerful art.  Her strong coloration and bold women full of life are impossible to pass by in an exhibition without feeling their impact.

D.O.M. cherishes these female rebels with each big fat paint stroke.

And who was the bold woman who inspired her the most? Madonna – first as her inspiration in life, and then as her muse.

“When I was young, I had to be the strong one.  I had to support my parents and younger brother, it was a difficult time,” says D.O.M. Back then, even her art was difficult. “I went to Art School, and my teachers told me I should never paint.  They said I could sculpt or do other art but my paintings were worthless.”

While working in a coffee house, she finally really listened to Madonna’s messages. She realized how strong Madonna really was, what a rebel she’d been, and found a hero in spirit that has helped support her own bold spirit through hard times. Madonna made a huge impact on her life.

After a leg injury left her disabled for a time, she decided to paint on the canvases she’d bought for school to pass the time.  Her Manager saw them and suggested that she hang them at the shop and have an exhibition.  D.O.M. said, “but my paintings are worthless!”  The Manager hung them anyway. There were 9 of them. 8 sold.


Madonna, Oil Painting, Art by D.O.M., Strong Women
Detail, Madonna Painting by D.O.M.

D.O.M. married, and eventually took an office job to help support her young and growing family. Thirteen months ago, with a one-year-old baby, D.O.M. was laid off. In a bold, Madonna-like move, D.O.M. decided that she should pursue her artwork. And that she had one year to make it.

Since then, she has been in 8 different exhibitions in 3 countries,with another coming soon in Glasgow ( January 2016 ), the next in Lost Angeles (April 2016) and after that, New York (November 2016).

DOM art regents park
One of D.O.M.’s Rebel Women Paintings in the Underground

I met her at the Parallax Art Fair in London, where she was showing several of her Rebel Women series, http://bit.ly/1TPMskN all based on her muse, Madonna.  “I didn’t want Madonna to think I was using her to get publicity and sales, so I changed them”, says D.O.M., of the Rebel Women works, “but she (Madonna) inspired them all.”

D.O.M. was the busiest of all of the 200+ artists at the Fair. We joked about making up t-shirts that say, “Buy My Art so I don’t have to go Back to the OFFICE!”

She didn’t need the t-shirt. She’s now selling well and has several commissions lined up. Her art is now collected in 6 countries. She has won awards. But is that enough?

Nope. “I really want Madonna to have my painting of her,” says D.O.M., “and I want to be there when she sees it! She changed my life.”


painting, madonna, oils, strong women, bold womenWhen we Skyped to interview for this piece, D.O.M. was busy painting a masterful Madonna, whose eyes dare you to see her as anything but powerful. Madonna’s just gotta see this one.

Help her out! If you have connections or have connections that have connections, pass along the word, would you? Help this talented painter meet her hero and her muse, and give Madonna the painting.

@domartstudio

Links:

D.O.M.’s website

Artistasy.com Interview with D.O.M.

_________________

btw, it worked.  Madonna got the painting – and D.O.M.’s going strong.  Check out her website or FB page.

CICCONE
Ciccone by D.O.M.

Info on Painting with Gravity – Liquitex Pouring Medium Demo

contemporary, abstracted underwater painting, blues and oranges, by Linda Ryan
New Series of Underwater acrylic pour paintings
Dreams of the Reef at Dawn by Linda Ryan
Copyright 2015 by Linda Ryan

I recently posted a YouTube video (link below) where I demonstrate how I created this underwater painting using Liquitex Pouring Medium, acrylics, a spoon and my (gloved) finger … ok, and a couple of tarps and stuff like that.

It was one of those magical afternoons when, after four days of painting mostly bottom layers, it all came together and just flowed. Sometimes, in the words of Audrey Flack (Art & Soul, a wonderful book), everything disappears in the room except the art and you … and then it’s just the art…

I happened to get lucky enough to get that on film!

Because of that, the Pour Painting Demo – Dreams of the Reef at Dawn makes it look pretty easy.

Once in awhile it’s just you and the art, and then…

ARTISTS: If you are an artist and want to try it, please spend some time exploring the medium on a smaller scale, first!  It took me a couple of years of experimentation to get to a good understanding of how each different pigment is going to react to the medium. Some float, some like to sit on the surface, some like to be by themselves and some overpower everything around them.

Nowadays there are a lot of videos out there that demonstrate how to use the medium, and you can also use my earlier “DIY” blog to get a little grounding in the medium.

Then, be brave, get your gloves on and start pouring!

DIY LUMINOUS POUR PAINTING with LIQUITEX POURING MEDIUM

Big Flow - Acrylic Pour Painting in Warm Hues copyright 2014 by Linda Ryan
Big Flow – Acrylic Pour Painting in Warm Hues copyright 2014 by Linda Ryan

www.lindaryanfineart.com  <— in case my lack of tech-ability got you lost

Hi Friend in Art-

Here’s some good stuff that can help you make Luminous Pour Paintings at Home.  To keep it luminous, make sure to use mostly transparent pigment.


Small Acrylic Pour Painting Copyright 2015 by Linda Ryan
“Rising”, Pour Painting Copyright 2015 by Linda Ryan – this one was built in two layers  – oranges first, allowed to dry, then blues

Basic Luminous Pour Painting

Let Go and Create Using Gravity as Your Brush

It’s an exciting, liberating way to create beautiful, movement-filled, luminous art.

It forces you to let go of total control and let the medium and the pigments frolic and play to make some flippin cool stuff.

Of course, the more you explore it, the more control you have – but never like you would with a brush.

That’s a good thing. Free up.

Let’s Get Started

Basic Supplies (general list, detailed information to follow):

  • Poly tarp (heavy duty plastic can be found at Lowes or Home Depot)
  • Gloves
  • Plexiglas scraps (for practicing)
  • Cradleboard
  • Gesso (brand suggestion: Not fussy about this)
  • Liquitex Pouring Medium (THIS IS MAGIC STUFF – WOOT WOOT!!!)
  • Acrylic paints (recommend: Golden Fluid Acrylics or Liquitex Soft Body)
  • Small plastic containers for mixing/storing variety of colors
  • Dixicups (optional, but used for propping pieces off table)
  • Tub to collect paint drippings

Colors:

First, pick your color choices for this painting. I’m providing some of mine as examples.

Paint Group Suggestions

For your first Luminous Pour Paintings, I’d suggest picking a group from the list below; a few light, transparent paints, one or two darker, and a few metallic or interference colors. In your first paintings, try to aim for a more light than dark, create movement with a smaller amount of the darks, and highlights of opaque or metallic or interference paints. Play with one group of colors before moving on so that you can start to get a feel for it

Let go of the need to be perfect!

Warm:

  • Quinacridone gold – or transparent yellow iron oxide
  • Quinacridone burnt orange
  • Mixed blacks/brown (ex Anthraquinone blue and Quinacridone burnt orange)
  • Interference gold and/or orange (mixed fairly thickly, but evenly)
  • Any metallic gold or bronze

Cool Toward Purple: 

  • Pthalo blue (blue shade)
  • Mixes of degrees of blue (blue shade) or Anthraquinone blue and Quinacridone magenta
  • Quinacridone magenta on its own, or pushed a bit with pthalo or anthraquinone blue, or shaded down with a touch of pthalo green
  • Opaques – white, or interference blue, violet, or even a little gold
  • Mixed black from Quinacridone magenta and Pthalo green (may need a touch of transparent iron oxide to push it)

Blue, sea tones:

  • Pthalo blue (green shade) some lighter, some darker
  • Pthalo green, blue shade
  • Transparent Yellow Iron Oxide
  • Transparent Red Iron Oxide or Quinacridone Burnt Orange
  • Mixed black from Pthalo Blue and Quinacridone Burnt Orange
  • Metallic golds or bronzes
  • Interference gold or green

TEST IT OUT:

Snag a Plexiglas panel and some gloves. Put the gloves on.

Pick a light and a dark paint from the group you choose. Pour three half dollar size puddles of your light, three quarter sizes of your dark. Squiggle some metallic or interference pain around.

Start tilting!!! Don’t be afraid of diagonal tilts either, or reversing a tilt. The idea here is to see what the paint does, what happens when you tilt it sharply or lightly, how they flow together, stick stubbornly, mingle, drip it off the sides, make a general mess. You can’t ruin it – this is practice.

Find what you like, (or liked, as it probably changed as you tilted it) and think about what you did to make that happen.

Stuff You Will Want to Know

Mixing Your Paint with Pouring Medium

Mixing can sometimes be the most time-consuming step, but if you do it right, your piece will be better in the end.

  • Carefully pour some medium into a jar or cup, then add a few drops of your pigment, then more medium, and more drops. Pour carefully to avoid a lot of bubbles. This medium can froth and you can end up with a frothy bubbly painting instead of the resin-like surface this medium is meant to help you create.
  • Start stirring with a plastic spoon, lifting the mix from the bottom up. If you swirl from above, you risk introducing a lot of air, creating bubbles.
  • About the bubbles – Never shake pouring medium! If you do, you have to wait for it to settle down before it’s usable.

Getting the color you want:

This medium is almost milky translucent. It won’t be when it dries – it’ll be clear. It makes your colors look lighter. This isn’t yet the forum for a lot of color theory, but these tips will help:

  • Mix black from lots of drops of transparent paints
    • Alizarin Crimson + Pthalo Green
    • Anthaquinone Blue + Quinacridone Burnt Orange (My Fav)
  • Mix Great Brown by adding more of the Alizarin Crimson or Burnt Orange
    • They won’t look black or brown – test it on white paper or the plastic tarp.
  • Really Light Colors – if you want really light colors like baby blue, instead of adding white, which makes it opaque and deadens the luminosity, just use very few drop of your blue and let the medium separate the pigment particles and bounce light between them and give you your light color. You will be using light instead of paint to make a light color – as long as you are working on a white or gessoed surface. Test it by rubbing some across white paper or your tarp.

How much do I mix up?

More than you think you will need. You always need more than you think. Store leftovers in an airtight container.

 ____

OK let’s make a beautiful mess!

In your first paintings, try to aim for more light than dark in the beginning, create movement with the darks, and highlights of opaque or metallic or interference paints. Play with one group of colors before moving on so that you can start to get a feel for it.

Let go of the need to be perfect. You are learning.

Gloves on!

  • Pour your main light first – this is the most paint you will use with this beginning project. For your first project, don’t over thing where it will end up – just pour where you’d like it to start.
  • Add another medium color if you want where you want
  • It’s a fun time to put in a bit of interference or metallic if you like that stuff
  • Using small tilts, tilt to the side, tilt it away from you, and tilt to the other side if you want, and then tilt toward you to spread it around a bit. It’s ok if some of it runs off the side.

Add Your Darks

  • Don’t be symmetrical about this!
  • Choose where you want to start your darks. Try to avoid too much symmetry. Symmetry kills motion. Balance is good, but achieve it without doing one there, one here, one there, one here …
  • Add puddles or swoops of your blacks, smaller browns perhaps next to, in or near them, and then add some small areas of bronze and/or interference gold and/or metallic bright gold … these are just starting tips. You can totally experiment one you get the concept down.
  • If you want to lighten an area, you can pour clear pouring medium in that area.
  • Note—Adding anything to an area will push the paint next to it away a bit, in general, and even more so when you tilt it toward that paint. Sometimes you may want to do that on purpose.

Time to Really Tilt that Puppy

  • Try not to do exactly the same order of tilt as before. You can try a little tilt at first, at this point can tilt it the other way if you don’t like it and a lot of it will correct itself. Diagonal tilts are often effective at this stage. You can also run a gloved finger to mingle some paints together (this is great with bronzes, golds, etc. that like to stick together and float around the top).
  • You might want to get brave and do a big tilt or a diagonal tilt – or tilt and turn and tilt and do little titls. Stop and look at it once in a while. I had no idea how often and long I just stopped and stared at a pour painting in process until I started working on YouTube demonstration videos. I think I’ll cut those parts out.
  • Try to remember where your darks may have anchored themselves to the board – you may only see a ghost of them now through this glue-like stuff, but you will see them when it all dries and it can really change the composition.
  • Don’t worry too much, through, you can do another layer later if it isn’t quite there.
  • While it’s still wet, you can squeeze, drop or pour your mixed paint into holes that are left on the surface, use a gloved finger to encourage paint to meld together or swirl, or to shore up funky edges and gaps. You might want to use that gloved finger or the back of a spoon to soften up the edges if you do that, or to bring paint out to the edge of the painting.
  • If it’s started to dry, don’t add more paint. You can do a little of this later, or do a completely new pour on top as long as it’s all dry (wait a couple of days to make sure … unless it still looks milky, and that means waiting even longer)


Be Done Before You Think You are Done

When you are done, wipe off the sides with your gloved finger (just to smooth it out a little) and if your working surface isn’t level, transfer it to a level surface and let it dry on top of Dixie cups (you can add extra Dixie cups to the one side to make it more level if needed). Make sure the surface is protected – this can really run if not level, and engulf whatever is in its path.

Keep Pets and Small Children Away

I know from experience that cleaning up gooky cat paws and paw prints on a floor is no fun and the cat doesn’t like it much either. Rubbing alcohol can help the floor. There’s nothing much for the cat but soap and water.

Plus it messes up your composition big time!

Bonus Tip

ITCHING TO STILL PUSH IT AROUND? After about 30 min – 2 hours depending on your humidity, heat and airflow, the cloudiness in the top surface will have cleared just a bit and formed a skin. Doesn’t mean you should touch it! BUT—if as it starts to clear you don’t like what’s going on underneath, you may be able to nudge the underlying layers in a different direction by giving it a little tilt. This is because the bottom layer is still wet and moveable.

Don’t nudge it too far, you can end up with weird buckles and bumps on your surface. Sometimes I’m ok with that. If it’s not too thick, you can correct it with a clear pour.

Tips & Tricks: Tools & Materials

General:

  • GLOVES! – Always wear gloves. This is like glue and your cuticles will hate you!! You will need more than one pair. I always end up with interruptions while my gloves are goopy and have to tear them off and grab another pair. You can use less gloves if you keep a bucket of water around and drop them in it (and remember to fish them out later for drying).
  • Yucky clothes & shoes. You will get it everywhere. If you are a very meticulous sort, definitely use yucky clothes and shoes and make sure to drop some paint on them right away. Then you’ve already been messy so you can stop worrying about it and let loose.
  • Poly tarp or large black garbage bags to protect your painting surface and the floor. Poly backed paper tarps work really well on the floor – the medium dries faster on the paper. I like poly on my work surfaces, as my friend Virginia, a found-object artist, likes to peel all of the dried goo and create new art. I love that.
  • Airtight containers to mix and save the paint and medium mixes in. I’ve heart of people using Ziploc bags, but that sounds too intensely messy even for me. When your containers get too gunky to use, you can soak them in a bucket of bathwater (I’m in California and we are in a drought) and the paint will peel off. Same with your plastic spoons.
  • Toothpicks or – best – wooden skewers for kabobs for popping bubbles and sometimes to swirl your pigments together ( also like using a gloved finger or plastic spoon better for swirling – Less chance of funky white divots from scraping the surface)
  • Plastic knives, spoons for mixing and pushing paint around (I like spoons, but knives work well for dripping paint in a controlled fashion)
  • A level. You may be unpleasantly surprised to find out what your painting has done overnight if you leave it unlevelled. This stuff likes gravity and will go where gravity dictates. Always good to check it each half hour.
  • Paper towels, or rags
  • A bucket of water for dipping your gloved hand in to clean it off
  • Rubbing alcohol, for cleaning up drops and spills and, well, sometimes we start cleaning up without our gloves on and … it does not help het it out from under your fingernails.

Medium

  • At least 16 oz. of Liquitex Pouring Medium if you are working under 16” x 16” in size. In fact, if you really want to start to learn the medium, don’t get anything less than a 32 oz. You will jut get hungry for more, and that itch to keep doing it, and run out. Stop buying café coffee for a couple of weeks, or cut something else out. You can do it. Put it into your art instead.

Paint:

  • Acrylic, artist grade. Don’t use craft paint or cheap student grade. The matting fillers in it don’t work well with the medium.
  • Fluid or high flow paints mixes best
    • If you are a careful, slow mixer, you can make thicker bodied acrylics work with interesting streakiness, or really keep mixing and make it smooth.
  • I use a lot of Golden transparents as in the paint groups section. I like them.
  • Don’t buy pre-mixed black. Just don’t. Unless you want the black to be really forward, dead, on the surface. Then you should go for it. Post me a photo. Maybe I’ll change my mind.

Your Painting Support:

  • I like using sanded cradled board, with 2 or 3 coats of gesso.
    • You can use pre-gessoed Masonite – it’s too slippery for my taste but because of that you end up using less medium, so if you are on a budget, it’s a way to explore the medium without breaking the bank. It just doesn’t turn out as thick and luminous.
    • You can also use Plexiglas – it will adhere permanently to this. Not super thin – too thin will flex while drying and distort your work. Thin is ok for practice.
    • Canvas stretched on cardboard can warp, but is fine to use for practice.
    • The above 3 options will all need framing if you have a successful piece.
    • Stretched canvas sags and the medium puddles in the middle. If you like that, try it, but I don’t like the effect. I am toying with the idea of stripping a painting off the stretchers and mounting it on board, and then pouring over it … but I haven’t done it yet so can’t tell if it would be as awesome as I think it might be. Let me know if you try it.

Get Brave. Get Pouring. It’s Good for You

(cheat sheet w/shortened steps follows – copy & print it for your personal use) 


Cheat Sheet

  • Gesso your Board so it has time to dry.
  • Make sure you have gloves, tarps, spoons, etc.
  • Set up a level drying area.
  • Choose your color palette and plan what paints you need to mix into medium.
  • Carefully mix your paint and medium into cups, squeeze bottles, etc.
  • PUT YOUR GLOVES ON!

Then

  • Pour! In the beginning, start with your light transparent color.
  • (You can tilt and tip anytime you want in this process)
  • Add a lot less of a darker color – you can always add more.
  • Add some metallic or interference or the opaque of your choice
  • Consider adding a dark or light on top of or next to your metallic/
  • Interference to get it to intermingle better, possibly even swirl it a little
  • Tilt and turn it unless you like how it looks and make sure to
  • Stop before you think you are done

After:

  • Set it on a level drying surface
  • Pop bubbles, decide if you want to do any more tilts before it forms a skin.
  • Check frequently for the first hour to make sure the paint isn’t dripping off one side – you may have to prop up that side a little.
  • After a couple of days, you can add another layer. It will take longer to dry.

To return to Linda’s website, click here.

Featured post

Blog at WordPress.com.

Up ↑